Tuesday, July 20, 2010

Reorganizing...Just Do It!!!

Ladies, you know how it is...we just keep getting more stuff!  I got a new set of pots and pans because I really needed some new ones...I still had a set that was 10 years old.  So I really needed to purge my space to make room for the new pans and that can only mean one thing...reorganizing.  Well, I went into my cabinet where I kept all my pots and pans and I dragged everything out.


Can you believe all of this fit in there???  I cleaned down the shelves and threw out things I no longer needed...like the lids to pans that have been long gone.  Now my new space was nice and clean!


I reorganized by putting all my baking sheets, muffin tins, cake dish, trifle bowl, and other miscellaneous items in this cabinet to give my pots and pans more room. 


Nice and tidy!  Now I moved my pots and pans to underneath my island and it's glorious to have them so neat.


 I really didn't know what to do with myself...actually, it got me motivated and I cleaned my kitchen and it looked so nice.  That's the problem with reorganizing...it's infectious and you can't just stop. It snowballs from one area to another!   Hahahaha!  What are you reorganizing???  I hope you're having fun enjoying your newly reorganized space...I'm loving mine...now to the next area!!!
Blessings on your reorganizing!!!

Seasoning Cast Iron

We will be going on our very first camping trip as a family.  Many years ago, my husband worked for a sporting goods store that got bought out by another sporting goods store.  So they were getting rid of all the old inventory to make room for the new.  Everything was marked down, plus my husband had his employee discount, so we got a tent, 2 cast iron dutch ovens, and a cast iron skillet for a song!!!  Now it's time for us to use it! I haven't used the dutch ovens so I needed to season them.  Here are the step-by-step instructions that the cast iron manufacturer provided.
  1. Wash new cookware with hot, soapy water and a stiff brush.  Rinse and dry completely.
  2. Apply a thin coat of vegetable oil or melted vegetable shortening to the entire surface (including lid if applicable), both inside and out.
  3. Line the lower oven rack with aluminum foil, and preheat your oven to 350 degrees F.  Place the cookware upside down on the upper oven rack.  The aluminum foil will catch any drippings.
  4. Bake the cookware for one hour, then turn off the oven and let the cookware cool before removing.
  5. Store uncovered in a dry place.
  6. After use, clean using a stiff brush and hot water only.  Towel dry immediately and apply a light coating of vegetable oil to cookware while still warm.
I used melted shortening. Here's what the cast iron looks like after being newly seasoned.  The one on the right is straight out of the box and is exactly what it looks like when you start.  The one on the left is how it will look after being seasoned for the first time.  With much more use, they will turn darker and darker.


  Now I've got to learn how to cook with it!!!  I've got a few recipes and I'm going to try dump cake so we'll see how it all turns out.  I'll keep you posted on the camping trip when we get back!
Happy camping and happy cooking!

Wednesday, July 7, 2010

Aprons

Another one of my projects this summer and hopefully wrapped up soon are the aprons I am making for my children.  I've been wanting to make them for a long time now and so the opportunity presented itself and here I am.  All the older Walmarts with a fabric section are getting rid of all their fabrics.  I missed the beginning of the 50% off by a day or two so all the quilting fabrics were gone, but I picked up a few other fabrics that will be part of future projects.  I found canvas/duck fabric and it was exactly what I was looking for to be used as aprons.  It will hold up to a lot of wear and tear so I am really, really happy with the $2.50/yd. pricetag!!!!  It is excellent material.  I've completed one and almost done with another.  I've got two more to go and this is how they will look.


This is my youngest and hers is more "fru-fru."  The daisy buttons along the top match the daisies on the edging of her pocket...too cute!!!!!  The apron I'm almost finished with is my son's.  His has black and white accents.  He can wear his when he helps Dad barbeque and with me in the kitchen.  My two older girls have their accents picked out.  It's a lot of fun and will probably go with them when they grow up.  {sigh}

Another great deal I found at Walmart was denim.  In an earlier post I showed all my jeans cut into squares ready to be sewn into a quilt.  I found the backing denim for cheap!!!  I can get moving on that once I'm done with the aprons!!!  Be warned, though.  The fabric is thick.  One or two layers are fine, but when you're dealing with seams and putting on the ties, MERCY!  I already broke two thick needles.  I think I've figured out how to negotiate it all, but as with anything, it takes a little bit of time!

What are you sewing up this summer???  I'll keep you posted with the aprons and the quilt as I finish them.
Happy sewing and blessings!!!

Tuesday, July 6, 2010

Canning Jar Jubilation!!!

On the morning of Fourth of July, I went to the thrift store to find a little jacket since we would be spending the day in the mountains and I've lost weight that I needed to get one.  I figured since I was there, I should also look for some canning jars since I need to gear up for more canning this summer and you can get a great deal if you can find them.  The thrift store was running a weekend promotion of 50% off most items for the holiday weekend.  LET THE HUNT BEGIN was my attitude!!!  Lo and behold, I found three boxes of various sized canning jars and all three boxes were half-off.  There were 38 jars total.  A quick scan of the jars inside led my eyes to an old blue Ball jar and one with the wire-type canning lid.  I knew my $7.00 would be well worth the cost.  I took them home and didn't touch them until we got back later that night.  Upon opening the boxes, I found canning jar treasure!!!  You will not believe the jars I got and after much research, I am completely amazed at the history that I found!!!  What started me on my old canning jar journey is the four jars I found at our church garage sale.  I paid $15 for all four of them without really knowing how much the value of old jars were and what would be a good price.  I've put them on my windowsill in the kitchen.


Now after finding my treasures in the box, I have found out all kinds of fascinating little facts!  You can date your Ball jars by the writing style on them.  Here is a great website if you're interested at all about figuring out the date of your jars:  here!  It's a great site to give you info on your jars.  So, without further ado, here are some of the jars I found.


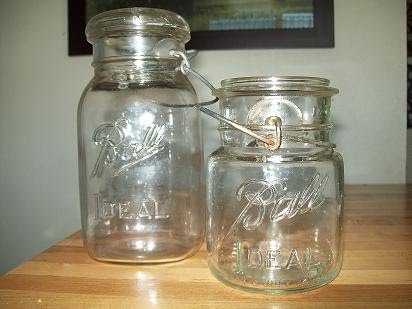
These are Ball Ideal jars manufactured in 1908.  They have the wire-type closure and use a glass lid.  The one on the left is the only jar I got with a lid so I am thrilled with it.  It amazes me to think that this glass is over 100 years old and was used for canning during WWI.  Remarkable!!!


 I actually got two blue Ball jars in my boxes.  The one on the left is much older than the one on the right.  Can you see the difference in how Ball is embossed on the glass (see the last L)?  This is how you date the jars.


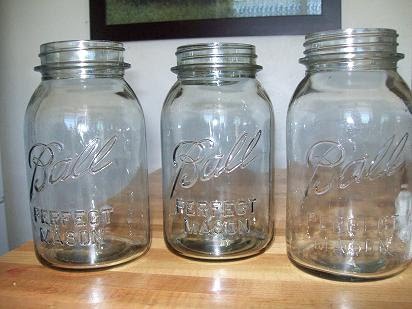
I got three of these Ball Perfect Masons.  What are so different about these?   It's a bit hard to see in the picture, but these jars are not clear.  They are gray.  They are worth a lot more.  In the manufacturing of these glasses, a chemical was used and once the jars are exposed to sunlight, they change color.  That's why you have blue jars, but you can also find amber, green, and amethyst colored jars.  WHO KNEW??!!  I had no idea! 


These are Kerr jars manufactured in 1915.  Kerr is actually the company who invented the two-piece system for canning lids that we now enjoy today.  I KNOW!!!!  Fascinating!!!


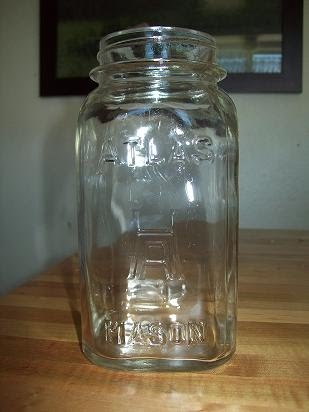
This is a square Atlas mason jar.  It was made in 1920.  Square jars are also worth more!  I didn't know this!  After finding all these great gems in my boxes, I had two more boxes downstairs full of quart jars I had gotten at the thrift store a while back for pickles so I started investigating.  Three of them are Longlife mason jars and are going for $10.00 a piece on ebay.  I also found some vintage quart jars that were made in the 1970's.  Since I was born in the 70's and I'm still working, I'm going to use the jars so they should still work, HA!  I also have a jar that is a Midland Mason jar.  It was only manufactured for one year--1975.  It's worth $8-$10.  I had no idea there were so many different canning jar companies!  It is absolutely mind-blowing that these jars have survived so long!!!  Again, I am inspired by these ladies from our past who diligently put up food from their gardens, not only to survive and have food for their families, but they also supported the war efforts.  By WWII, most canning jars were standard mouth jars (not wide mouth jars) because they were conserving as much metal as they could!  I am amazed!!!

I hope this enlightens you a little about canning jars.  I was trying to get some jars to can with and now I've got my own collection of antique jars.  What should I do with them???  Hmmmm......sounds like another post down the road!

Happy canning and happy treasure hunting!!!

Love the new gadgets here...

As mentioned in an earlier post, I have another blog on another site.  However, I am really loving the new setup here at blogger and I think I'm going to start posting here from now on!  It's awesome and I finally have a blog that looks the way I want it to...my other blog changed servers, sites, browsers or whatever the technical term is, and I'm really not that happy with it.  So, I guess this will be my blog home now!!!  Lots of posts to come...can't wait!  I used to have problems posting more than one picture here, but it seems the kinks are all worked out of the system and everything is sooooo user friendly!  I'm really pleased and look forward to blogging more!  I have to figure out how to import from my other blog...I know there's a way; I just have to figure it out!  Stay tuned!

Breathtaking!!!

While we were on vacation in Florida, we did all the typical things like Disney and Universal.  We also visited some not so typical places.  They were absolutely breathtaking and considered local gems!  One such place was called Blue Spring State Park.  This place is a natural manatee refuge in the winter months.  In the summer, it is paradise!  I have never seen water such a color in my life.  The wildlife was amazing.  There were six foot gars (a type of long fish) everywhere, not to mention all kinds of other fish.  I saw two massive catfish.  It was spectacular!  The water stays a constant 72 degrees year-round.  The family swam around in it, but even for Florida, it was chilly!!!  One look at this picture and you will see what I mean!


You can also see the trees with all the spanish moss hanging from them.  It was amazing!  What was strange for us coming from Colorado was all the palm trees interspersed with the regular trees...weird!!!  It was a gorgeous place and we were so happy to take this little excursion!


If you look at the above picture and see the dark shadows in the water, those are the gar.  Amazing!  It was a biological hodgepodge of everything and so fascinating and mesmerizing!  You can totally understand why the manatee hang out here!!!